


![]() Why is my website Lagging? Fees for overages, I can hardly believe how much I am having to pay. Of course, if you are dissatisfied with your host, the next question you might have is, how do change my web host? If you discover this is the time to change your hosting provider, but you don’t know how to begin, then this is the perfect article for you. Most people relocate their business websites like they relocate within homes – it could be stressful but it’s also fresh. Are you considering moving your site to one of the Edmonton hosting providers? Then, you are welcome here. This hands on Workbook will help you every step of the way from the basics of why it’s worth it, and right through to how to go about getting your website migrated. If you are an entrepreneur in Edmonton, an artist who needs to present their portfolio, or simply a user who is interested in hosting services in Edmonton, we have collected extensive and comprehensive but simple and informal information for you in this guide.
Why is my website Lagging? Fees for overages, I can hardly believe how much I am having to pay. Of course, if you are dissatisfied with your host, the next question you might have is, how do change my web host? If you discover this is the time to change your hosting provider, but you don’t know how to begin, then this is the perfect article for you. Most people relocate their business websites like they relocate within homes – it could be stressful but it’s also fresh. Are you considering moving your site to one of the Edmonton hosting providers? Then, you are welcome here. This hands on Workbook will help you every step of the way from the basics of why it’s worth it, and right through to how to go about getting your website migrated. If you are an entrepreneur in Edmonton, an artist who needs to present their portfolio, or simply a user who is interested in hosting services in Edmonton, we have collected extensive and comprehensive but simple and informal information for you in this guide.
Why Switch Web Hosts?
Before we talk about how to change web hosts, let's consider why you may want to switch your web hosting account. Many small businesses start off by using the cheapest web hosting they can find, but bargain web hosting probably isn't going to be suitable for your business when it expands.
What are some warning signs that indicate you need to change hosting providers?
- Your website is slow: If your website runs too slow, it may be time to move on to a different hosting provider. In many cases, hosted sites can cause your performance to be slowed down, and this happens in some situations. Ideally, hosting providers should give you page cache and Redis object caching with the aim of boosting site performance.
- You Pay Overage Fees: Most hosting providers limit the bandwidth or number of visitors a site can receive in one month to ensure that one site on a shared plan does not cause all the other sites to slow down. In case you end up exceeding these limits every month, then you might need to upgrade your plan or host your site at a various hosting provider.
- You Want to Monetize Your Website: You will also need a web host for ecommerce or memberships since additional security and reliability are required where customers’ payments are being accepted online.
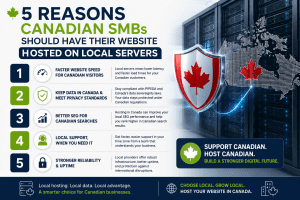
Why Migrate to an Edmonton Hosting Provider?
Let's talk, before getting into the gore of migration, on why you should think of moving to a Local hosting solutions in Edmonton. Some of the benefits that you can get from using a local hosting provider include:
- Speed and Performance: Generally speaking, local hosting solutions tend to have quicker load times than for visitors coming in from outside of Edmonton.
- Customer Support: Probably much very personal support with a local Edmonton hosting provider , no more waiting on hold for hours or emailing support teams that are half way across the world.
- Community and Networking: You're banking on your community with a local; you will get a chance to network with the local businesses and professionals.
- Compliance and Trust: A local provider is more likely to be aware of the regulations found in Canada, and if nothing else, it will give you peace of mind as far as compliance goes.
- SEO Benefits: Sites are more likely to rank for local searches because the search engines favor content based on region, and having your site hosted locally counts toward that.
Getting Started with Your Edmonton Web Hosting Migration
As you have already learned why it is necessary to switch to an Edmonton web hosting provider, let's dive into the Edmonton web hosting migration process step by step. Here, we'll break down each detail to ensure a smooth transition for your website.
Step 1: Evaluate Your Current Hosting Situation
Just before that, review your existing hosting service. Ask your self questions like:
- What are you happy with at your current service provider? (Performance, reliability, etc.)
- What is upsetting for me? This may include slow support, downtime, etc.
- What will I have to showcase (more storages, SSL certificates, etc.)
This information will then help you express your needs correctly as you start finding the right service provider for your good Edmonton hosting.
Step 2: Research Edmonton Hosting Providers
While in search for a web hosting provider in Edmonton, there are certain criteria to look for such as:
- Reputation: Read online reviews and testimonials that will let you know the level of satisfaction from customers.
- Services Offered: Ensure that they are offering your needed hosting type (shared, VPS, dedicated, etc.) and any other feature desired.
- Support Services: Determine what kind of support is offered – support 24/7 is usually the most common choice.
- Scalability: As your website grows, so will your needs. You may need additional resources. Be sure that your provider can scale up with you.
A few local web searches really help. The best part? You can often sit down with a provider, and really start to form a
Step 3: Choose Your New Hosting Plan
Once you have a list of potential hosts, it is time to start comparing their hosting plans. Here are the essential elements to look at:
- Storage Space: What amount of disk space do you need? Do not forget that what is needed today might not be the same tomorrow so consider your current and future requirements.
- Bandwidth: Look for a bandwidth big enough to handle your traffic. Select a service whose bandwidth is not too small and does not have limits that may soon become too restrictive.
- Email Hosting: If you require email accounts under your domain, ensure they offer email hosting.
- Security Features: This brings me to that age-old saying: safety first! Look for SSL certificates, backups, and firewalls.
- Pricing: Compare the costs and beware of any hidden charges or fees.
Take your time, read the fine print, and pick a plan that suits your needs.
Step 4: Backup Your Website
Before you plunge into the migration process, securing a backup of your current website is crucial. Your backup must have:
- All files for your website, which may include HTML, CSS, images, etc.
- Databases: those using the dynamic sites powered by platforms such as WordPress or Joomla.
- If existing, email accounts.
There are several plugins and tools that you can use depending on your website platform, such as WordPress, to make backups efficiently. So always check if everything has been saved - it's better to be safe than sorry!
Step 5: Block Access to Your Staging Site
You'll need to lock your test site out of the search engines' indexes; otherwise, the probability is that the site will come up in the search results before it's ready. For starters, we recommend you incorporate password protection to both include out unwanted users as well as website crawlers. Most hosting providers have the functionality to do this via the hosting control panel.
Step 6: Prepare for Migration
Preparation is crucial! So here are the steps to take before you start the actual migration process:
Choose a Migration Method
Select how you would like your website to be migrated. Here are a few options for it:
- Manual Migration: The process will include downloading files and databases from your old host and uploading them to the new host.
- Migration Tools and Plugins: A lot of platforms offer plugins that will automate this process, especially on the popular Content management system such as WordPress.
- Provider Support: Some hosting providers offer free or very cheap migration. Check your chosen Edmonton hosting provider.
Server Environment Preparing
After you sign up to your new hosting plan, your provider will prepare your server environment. Be sure that it will meet the necessities of your website and CMS.
Step 7: Migrate Your Website
Now comes the interesting part: migration proper. Here's how you do it step by step:
- Upload files: If you are using FTP, connect to your new server and start uploading your website files.
- Transfer Databases: Utilizing phpMyAdmin, one imports the backup database to your newly acquired hosting account.
- Update Configuration Files: In case you are running a CMS like WordPress, then you will have to update the configuration files with your new database settings.
- Essential Software Installation: Ensure proper installation and configuration of all required software, such as PHP, MySQL for your website.
Step 8: Domain Transfer (If Necessary)
Please note that if you are changing or moving your domain to another registrar, you will have to process the transfer of your domain. This process involves:
- Accessing your domain at your current registrar.
- Getting an authorization code for the transfer.
- You should notify your new registrar of that code and seek her help in the whole process.
For instance, you may like to begin with doing the domain transfers as much in advance as possible, because that will take a week.
Step 9: Testing
Before letting the world know about the migration or redirection of your domain, test the integrity of your website. It should be perfectly free from broken links or media, from forms to interactive features, page loading, and even email functionality, if such is available.
Step 10: Update Domain DNS Settings
If you're holding your domain with your existing registrar, you will need to alter your DNS settings so that they point to your new Edmonton hosting provider. You will need
- Log in to your domain registrar.
- Update nameservers to one given from the new hosting company.
- Save your changes.
Remember, DNS changes may propagate through the entire network; this change may only take 48 hours to be fully updated. That means some visitors can still land on your old website during that time.
Step 11: Final Checks and Go Live!
Congratulations! You are almost there. After allowing a little time for DNS settings to propagate, do a final test of your site with the following checks:
- View all pages to verify that the text is comprehensive.
- Run a speed test.
- Try to look at error messages.
Provided that everything is in order, it is now time to get the word out. You can now declare to all of the world that your website has moved to a new Edmonton web hosting service.
Step 12: Monitor Performance
Performance Site After launching your website, you should closely monitor performance. Any deviation from expectations in visitors' behavior, site speed, and uptime should not shy you away from raising a red flag to your new hosting provider support service.
Keeping your Website Healthy after Migration
Congratulations! You have successfully migrated to Edmonton web hosting. But that doesn't mean that the journey is at the end. Healthy keeping of your website is as important. Here are some fundamental tips to keep your site healthy and running well
- Monitor Performance often : Track your site performance with Google Analytics and Search Console, and regularly monitor uptime and load speed to make sure your site is performing optimally.
- Safety Measures : Safety always comes first! Make sure you have installed security plugins, perform regular backups, and are even considering investing in a security certificate or firewall for your site.
- Keep Up-to-Date : Keep your website and all of its plugins current. Most upgrades will enhance performance and remove security holes.
- Interact with Your Audience : Use social media and e-mail marketing to regularly interact with your customers. Having a local hosting platform in Edmonton will enable you to do this and build powerful relationships within your community.
- Solicit Feedback : Don't be shy to ask your users for their experience of having used your website. Continuous improvement is the way to long-term success.
Wrapping Up
Switching to an Edmonton hosting company may seem like an easy process if you have a good planning and preparation schedule. The local hosting companies of Edmonton provide you with better performance and personalized support aside from helping to fortify your relationship with the community. You are well geared to navigate your web hosting migration like a pro with this guide.
So, now that you know all the advantages, wait no longer. Get started with Edmonton hosting now ! Great local support awaits your online presence. Migration successfully completed!