Sometimes, it might be useful for you to be able to display Joomla modules only when certain conditions are met. By default, articles can be published in Joomla for a specific range of dates, but that's the limit to what you can do
MetaMod is an extension that brings that same functionality -- and more -- to modules. It includes other Joomla modules, so it will work transparently with any type of module
As with all extensions we'll be showing you, start by going to extensions.joomla.org. Then, navigate to the Access & Security / Frontend Access Control category and find the MetaMod page
1) Click Download
 
Â
You'll be taken to the MetaMod site
Â
2) Click download
 
3) Save the file to your computer

4) Now, install the module as you would any other extension
Â
For assistance with finding or installing extensions, watch the first two tutorials in this series
Â
5) Once the module has been successfully installed, go to Extensions
 
6) Click Module Manager
Â
Scroll right
Â
7) Click New
 
Â
Scroll down
Â
8) Click MetaMod
 
Â
MetaMod is a pretty versatile extension, with many conditions that can be used to determine whether or not it will display a particular module
Â
We'll go over everything briefly. If you ever question the purpose of a setting, consult the detailed documentation that can be found on the extension's website and on each option's hover description
Â
For this module, we're going to be recreating our User Menu so that it contains some admin links, too. Ordinarily, the links would show up to all registered users; with MetaMod, we'll be able to allow only admins to see them
Â
9) Type a title for this module

10) Set the Access Level to Registered
 
11) Since this module is acting as a main menu module, type _menu here to give the module the curved edges main menus typically have

Â
There are two ways to include modules with MetaMod: by using "quick" mode and by manually typing PHP code. Unless explicitly stated, all settings you enter will apply to both quick module includes as well as regular module includes
Â
If you want a module to only show up for a certain date range, that can be specified here
Â
Scroll down
Â
Here, you can choose to whom the quick modules you'll specify below will be displayed

Â
You can also allow or disallow people from specific countries or other geographical areas to see the modules
Â
This requires that you download and install one of three databases, as described here
Â
Scroll down
Â
The final condition allows you to display the modules only to people whose preferred language is in the list
Â
Scroll down
Â
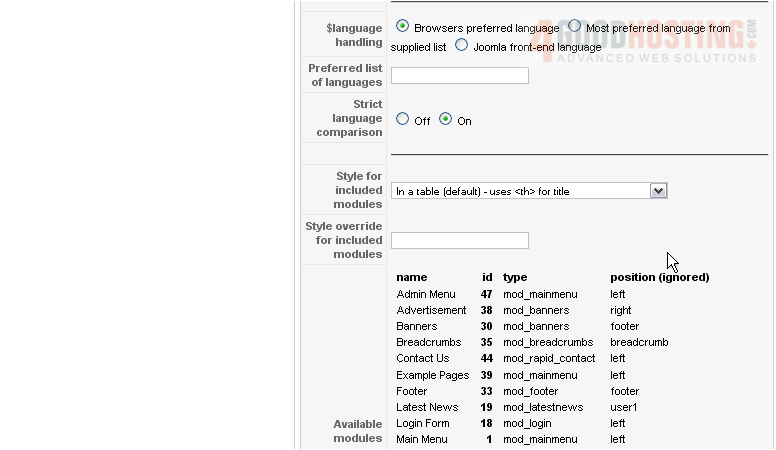
This list is important; it specifes the IDs of all enabled modules. You'll need them when specifying the modules you want to include in the fields that follow

Â
With Quick module id include, you can specify a list of modules to include after applying all of the conditions you've entered above. Quick modules will be included before any you manually enter below
Â
When listing quick modules, you should separate each ID by a comma
Â
Scroll down
Â
Here is where you manually enter PHP code to choose which modules to display. All conditions above will apply in addition to any you add here

Â
For a list of examples and a list of the PHP variables you can use, scroll down
Â
Read over the description and examples carefully

Â
Scroll down
Â
Here is a list of all the PHP variables that can be accessed in the box above. Their only purpose is to further extend what sort of conditions you can apply

Â
Again, the documentation is quite clear, so read over it carefully if you're thinking about using any of these more advanced conditions
Scroll down
Â
...the list continues

Â
Scroll back up
Â
We're going to be including the existing User Menu without any further conditions
Â
12) Type its ID here

13) Next, use code similar to the examples below to include any additional modules

Â
Note that a return statement will end PHP execution, so it's not possible to have multiple return statements in your code. If you want to specify multiple module IDs, you must do so using a comma separated list or a PHP array
Â
In this case, we'll be including the Admin Menu for only Administrators (and Super Administrators)
14) Clear the sample code
Â
15) Type the new code

Â
The variable $user->usertype is described below
Â
Be sure to use double equal signs as shown here and in the examples below
Â
| This means "or" in most programming languages. The pipe symbol is used, and can typically be typed by pressing SHIFT and backslash
Â
This is the ID for Admin Menu, as listed up here
Â
Scroll up
Â
16) For this MetaMod module, we'll be changing the style for the included modules to Naked. This will prevent each individual module from displaying its title

Â
Scroll up
Â
17) Click Save
 
Â
The module has been created!
Â
Now we need to prevent the included modules from showing up anywhere but inside the MetaMod
Â
18) Scroll down and find the old User Menu
 
Â
Scroll down
Â
19) Under Menu Assignment, click None
 
Â
Scroll back up to the top
Â
20) Click Save
 
21) Repeat the process with the Admin Menu, then scroll down and find the new User Menu we just made with MetaMod

22) Change the order to bring the module up below the Main Menu

Â
Scroll up
Â
23) Click the save icon
Â
Finally, it's time to check out our new User Menu
Â
24) Click Preview
 
Â
Scroll down
Â
As you can see, the menu doesn't even show up for unregistered users

25) Log in as an administrator
Â
The menu looks correct for an admin. Let's verify that a normal Registered user can't see the admin links

Â
It worked! We've successfully combined the two menus, allowing only admins to see the admin links

Â
This is the end of the tutorial. You now know how to display modules conditionally using MetaMod

 WGS AI Assistant