How to create hosting plans in WebsitePanel

This tutorial assumes you have already logged into your WebsitePanel reseller control panel

Now let's learn how to create Hosting Plans

1) Click Hosting Plans
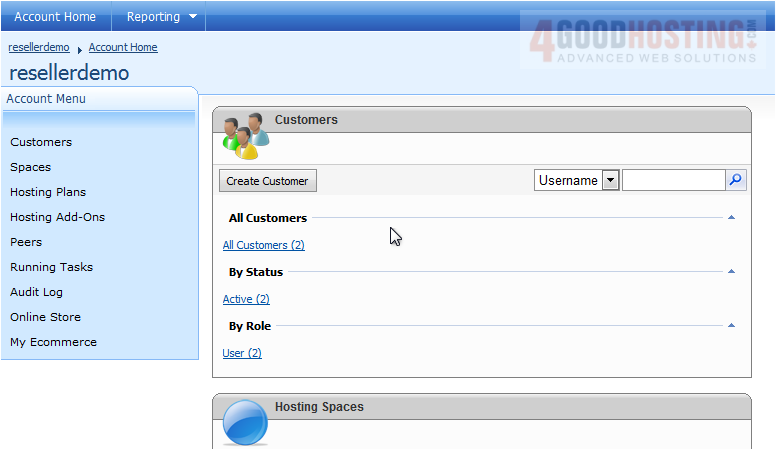
 

2) Click Create Hosting Plan


3) Enter the Plan Name here


4) Enter the Plan Description here


5) Select the Hosting Space that will use this plan


6) All of the Quotas are now listed below. Go through each quota and select the settings you prefer


Note: Your Quotas list may look different, depending on the server settings


7) Click Save to create the hosting plan


Your Hosting Plan has been created.


The plan name is listed here


Copy allows you to copy this plan (great when creating multiple plans)


The amount of spaces using this plan is shown here


This is the end of the tutorial. You now know how to create hosting plans through your reseller account

  • 0 Users Found This Useful
Was this answer helpful?

Related Articles

How to backup your hosting space in WebsitePanel

This tutorial assumes you have already logged into your WebsitePanel reseller control panel...

How to create a peer account in WebsitePanel

This tutorial assumes you have already logged into your WebsitePanel reseller control panel...

How to change your reseller password in WebsitePanel

This tutorial assumes you have already logged into your WebsitePanel reseller control panel Now...

How to create a customer account in WebsitePanel

This tutorial assumes you have already logged into your WebsitePanel reseller control panel Now...

How to create hosting account addons in WebsitePanel

This tutorial assumes you have already logged into your WebsitePanel reseller control panel Now...